Laser Marking on plastic is a precise and effective way. It can make permanent markings, logos, or text on the surface of plastic part. Moreover,this laser marking on plastic is clear, wear resistance and durable. Its operation is quite cost-efficiency, compare to Laser Marking On Zinc Die Castings. So laser marking process is also a kind of cost-efficiency effective approche that business men build their brand and promotions.
Choose The Right Laser Marking Machine, Set Up According Laser Engraving Drawing, Finish The Laser Marking On Plastic Project.
What is Laser Marking On Plastic ?
Laser marking is a technique that uses a laser to mark or engrave the surface of plastics by removing a portion of it. The laser beam vaporizes the material in very controlled ways, creating patterns, text, or images. It is a precise, permanent, and non-contact method of marking materials and is used in various industries for customizing products, adding identification marks, or producing intricate designs. The laser marking is used widely in many industries, such as consumer electrics, automotive parts and medical devices.
How Laser Marking Works ?
The process require some humen being actions to assist laser machine to finish the perfect laser marking. Combine human being wise with the numberical control system, will have an accurate and repetitive operation for batch goods.
- Laser Source: The process starts with a laser source (like CO2, fiber, or diode laser) that emits a concentrated beam of light.
- Focusing the Laser: The laser beam is focused onto a small spot on the surface of the material using lenses or mirrors. The beam can be directed by galvo scanners or CNC machines for high precision.
- Material Vaporization: The concentrated energy from the laser heats the surface of the material, causing it to melt, burn, or vaporize in the areas where the laser touches. The depth and texture of the engraving depend on the intensity and duration of exposure to the laser.
- Computer-Controlled Motion: A computer controls the movement of the laser beam across the surface to trace out the desired design. This process allows for extremely detailed and intricate patterns.
- Removal of Vaporized Material: As the laser vaporizes the material, debris like smoke or dust is created, which is often removed through a ventilation system to ensure a clean finish.
Laser Marking On Plastic Operation Approaches
We should choose the reasonable plastic parts and make laser marking on plastic , ensure if the plastic type is suitable for laser engraving. The below plastic material is favor of laser marking.
1. What Plastics Can Be Laser Marked?
Not all plastics are equally suitable for laser engraving. Relying on our rich experience for laser marking on plastic parts over past decades years, We will recommend the blew some common plastic materials that work well. They include the below items:
| Material Items | Advantages |
|---|---|
| ABS (Acrylonitrile Butadiene Styrene) | Engraves to a frosted or slightly melted appearance, maintain good contrast with laser marking.Laser Type: CO₂ Laser (9.3–10.6 μm wavelength). |
| Acrylic (PMMA) | Engraves smoothly with a frosted finish, Laser Type: CO₂ Laser (best results at 10.6 μm). |
| Polycarbonate (PC) | generates high-contrast marks, high heat resistance, engraves with a slightly rough texture. Laser Type: UV Laser (355 nm) for clean marks. |
| Polyamide (Nylon) | Strong and wear-resistant, Laser marking creates durable, high-contrast engravings. Laser Type: CO₂ or Fiber Laser. |
| Polyethylene (PE) | Difficult to engrave, Requires special additives (e.g., LDPE with laser-sensitive pigments). Laser marking works best with UV lasers for high contrast. |
| Polypropylene (PP) | Can be marked with UV lasers (355 nm) for high precision,Chemically resistant, good for packaging and labels. |
| PVC (Polyvinyl Chloride) | Low-cost, widely used in electrical insulation and signage, Laser marks dark and clear with high contrast. |
| Requires special additives (e.g., LDPE with laser-sensitive pigments) | Some pre-doped with additives (e.g., LazerFlair) for high-contrast marks. Laser Type: Fiber or UV Laser (for high precision) |
We should clean the place and area will be engraved, and ensure where not any oil, dirt and dust. If the part is small or lightweight, fix and secure the plastic part by using a jig or clamp to avoid movement. In order to achieve a high efficiency mass production, we can tailor custom jigs.
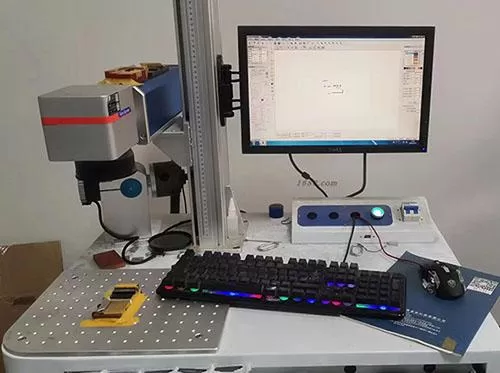
2. Select the Correct Laser Machine
Different type of laser machine can engraves different material and the depth of engraving you want. Also ensuring laser marking logos ,text and patterns must be clear and perfect. We should choose the right process from the follow methods.
| Material | Marking Result | Recommended Laser Machine |
|---|---|---|
| ABS | Excellent | UV, Fiber |
| PC | Excellent | UV |
| PP | Good | UV |
| PE | Fair | UV with additives |
| Nylon | Excellent | Fiber |
| Acrylic | Excellent | CO2 |
3. Design the Artwork
Laser engraving machines generally work with vector file formats such as .AI, .SVG, .DXF, or .EPS. We use these software like Adobe Illustrator, CorelDRAW, or AutoCAD to create the design, draw vector files for engraving specifications. The design is appropriately scaled for the plastic part. Set the resolution (DPI) based on the level of detail required—typically 300-600 DPI for plastics. Invert Colors setting if needed. Defaultly the engraving process may interpret the design as black (engrave) and white (no engraving). If you need color pattern or text, you may do post-engraving process, painting and coating.
4. Solutions For Common Laser Marking Defects on Plastic
- Burn Marks: The defect is common caused by excessive laser power or slow mark speed, good solution is reduced laser power and increased scanning speed.
- Poor Contrast: The reason is caused by wrong wavelength or incorrect focus, good solution is using UV laser and optimize focal length.
- Surface Melting: The result is caused by excessive heat input, good solution is lower power, increase pulse frequency.
6. Post-Engraving Finishing
After laser engraving, some residue or dust left on the surface of the part. we commonly use a soft brush or compressed air to clean them off. For stubborn residue, use typical isopropyl alcohol and a soft cloth. Check the engraving quality, Being sure it is clear, legible, and uniform. Improve the defect parts continuously until all of plastic part engraved acheive specific quality standards.
If the engraving needs to reinforce the engraving mark, you can use paint and varnish to the engraved area. This is common when engraving plastic parts logos have a poor contract with the color of parts , other contract colors can be used to cover it and creat a fine contract colors. In some cases, a protective coating or varnish is used to enhance the durability and appearance of the engraving.
Laser Marking On Plastic Parts Study Case
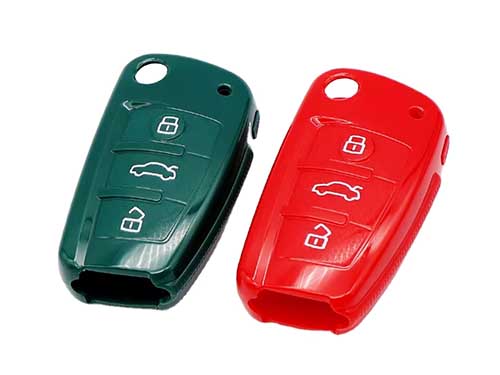
Automotive Key Case Cover : Engraving QR code On PV + ABS with CO₂ Laser
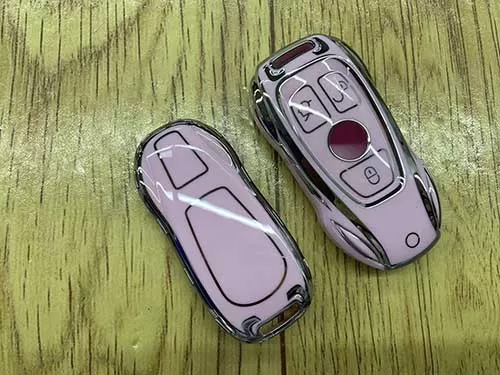
Automotive Key Case Cover: Plastic car case cover electroplating + Marking QR code On TPU soft plastic with UV laser.
FQA
Q: What Is The Best Laser For Marking Plastic ?
A: UV laser engraving is the best marking on plastics. It is suitable for most plastics, such as PVC, ABS, PET,TPU and engineering plastics. It can create attractive permanent perfect pattern and logos quickly on the plastics in high efficiency without any damage of the surface of part. generate constract color, and endure repeative wear.
Q: How long does laser branding last ?
The laster branding last about the range from 5 to 15 years. Like laser marking on the plastics, which possible fade out under strong sunlight for long time, The heat and chemical reaction makes the laser marking degrade. If it can be far from the above, The plastic marked by laser is almost used permanently.
Q: How Much Should Laser Engraving Cost ?
The cost for laser engraving is decided by the different material and specific applications. The cost for deep engraving is expensive. while low engraving is cheaper. From the below different laser marking options, the specific cost is defined.
Simple marking (logo / number):
👉 $0.10 – $0.30 per part in medium complexity
👉 $0.30 – $0.80 per part deep engraving
👉 $0.80 – $2.00 per part common applications